24 KiB
Creating a libvirt Windows VM
Understanding The Virtualisation Stack
This method of configuring a Windows virtual machine for use with WinApps is significantly more involved than utilising Docker or Podman. Nevertheless, expert users may prefer this method due to its greater flexibility and wider range of customisation options.
Before beginning, it is important to have a basic understanding of the various components involved in this particular method.
QEMUis a FOSS emulator that performs hardware virtualisation, enabling operating systems and applications designed for one architecture (e.g., aarch64) to run on systems with differing architectures (e.g., amd64). When used in conjunction withKVM, it can run virtual machines at near-native speed (provided the guest virtual machine matches the host architecture) by utilising hardware extensions like Intel VT-x or AMD-V.KVMis a Linux kernel module that enables the kernel to function as a type-1 hypervisor.KVMruns directly on the underlying hardware (as opposed to on top of the GNU/Linux host OS). For many workloads, the performance overhead is minimal, often in the range of 2-5%.KVMrequires a CPU with hardware virtualisation extensions.libvirtis an open-source API, daemon, and management tool for orchestrating platform virtualisation. It provides a consistent and stable interface for managing various virtualisation technologies, includingKVMandQEMU(as well as others).libvirtoffers a wide range of functionality to control the lifecycle of virtual machines, storage, networks, and interfaces, making it easier to interact with virtualisation capabilities programmatically or via command-line tools.virt-manager(Virtual Machine Manager) is a GUI desktop application that provides an easy-to-use interface for creating, configuring and controlling virtual machines.virt-managerutiliseslibvirtas a backend.
Together, these components form a powerful and flexible virtualization stack, with KVM providing low-level kernel-based virtualisation capabilities, QEMU providing high-level userspace-based virtualisation functionality, libvirt managing the resources and virt-manager offering an intuitive graphical management interface.

Prerequisites
-
Ensure your CPU supports hardware virtualisation extensions by reading this article.
-
Install all dependencies by installing
virt-manager. This will ensure that your package manager automatically installs all the necessary components.sudo apt install virt-manager # Debian/Ubuntu sudo dnf install virt-manager # Fedora/RHEL sudo pacman -S virt-manager # Arch Linux sudo emerge app-emulation/virt-manager # Gentoo Linux -
Download a Windows 10 or Windows 11 installation
.ISOimage.
Important
'Professional', 'Enterprise' or 'Server' editions of Windows are required to run RDP applications. Windows 'Home' will NOT suffice.
- Download VirtIO drivers for the Windows virtual machine.
Note
VirtIO drivers enhance system performance and minimize overhead by enabling the Windows virtual machine to use specialised network and disk device drivers. These drivers are aware that they are operating inside a virtual machine, and cooperate with the hypervisor. This approach eliminates the need for the hypervisor to emulate physical hardware devices, which is a computationally expensive process. This setup allows guests to achieve high-performance network and disk operations, leveraging the benefits of paravirtualisation. You can read more about
VirtIOhere.
Creating a Windows VM
Note
If you are an expert user, you may wish to:
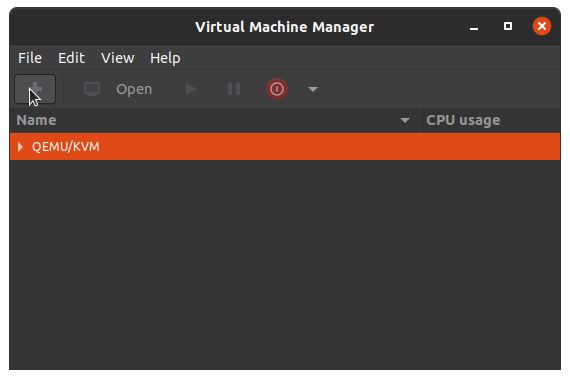
- Open
virt-manager.
Note
The name given to the application can vary between GNU/Linux distributions (e.g., 'Virtual Machines', 'Virtual Machine Manager', etc.)

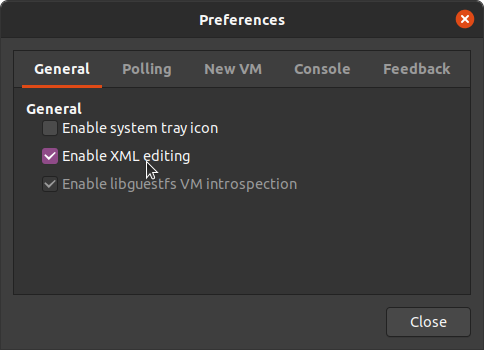
- Navigate to
Edit→Preferences. EnsureEnable XML editingis enabled, then click theClosebutton.
- Create a new virtual machine by clicking the
+button.
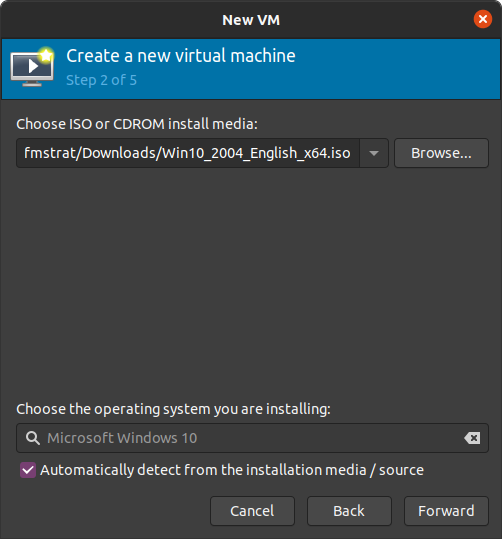
- Choose
Local install mediaand clickForward.

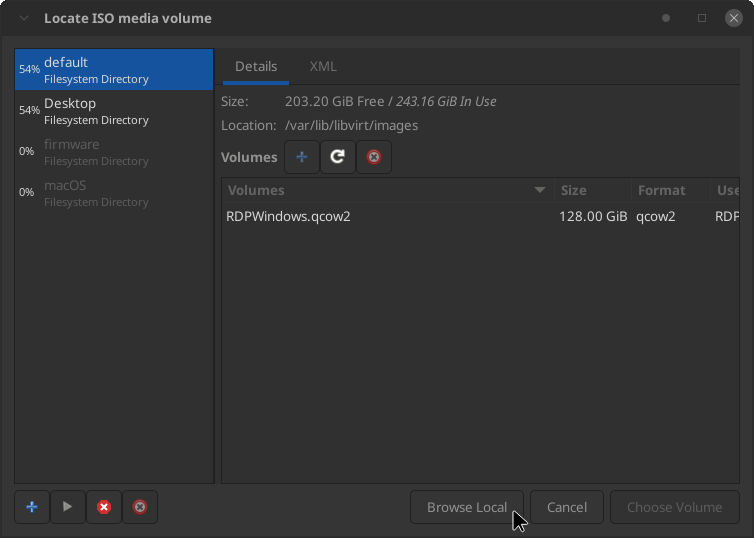
- Select the location of your Windows 10 or 11
.ISOby clickingBrowse...andBrowse Local. EnsureAutomatically detect from the installation media / sourceis enabled.
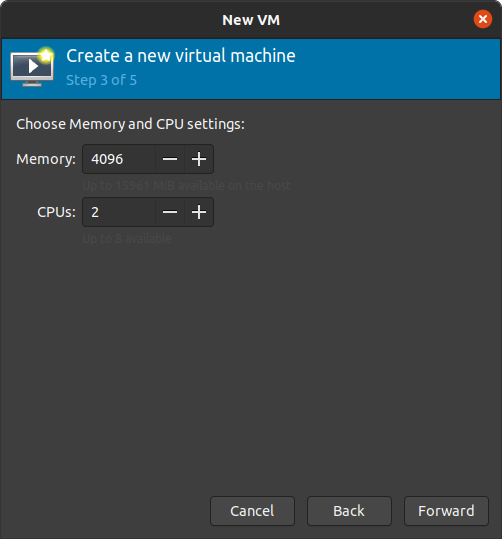
- Configure the RAM and CPU cores allocated to the Windows virtual machine. We recommend
2CPUs and4096MBof RAM. We will use theVirtIOMemory Ballooning service, which means the virtual machine can use up to4096MBof memory, but it will only consume this amount if necessary.
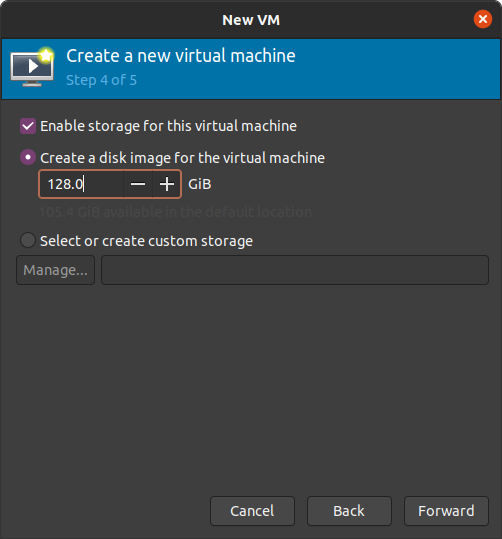
- Configure the virtual disk by setting its maximum size. While this size represents the largest it can grow to, the disk will only use this space as needed.
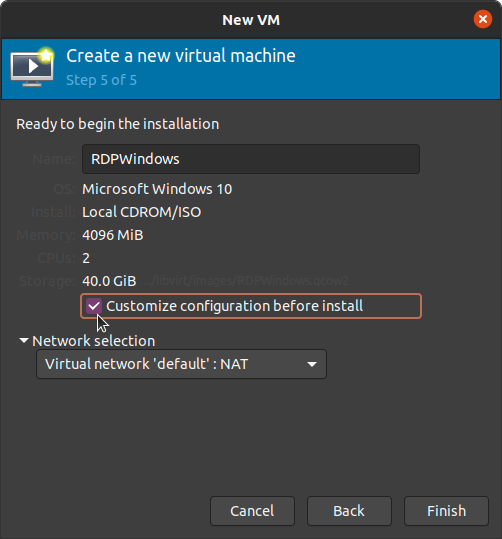
- Name your virtual machine
RDPWindowsto ensure it is recognized by WinApps, and select the option toCustomize configuration before installation.
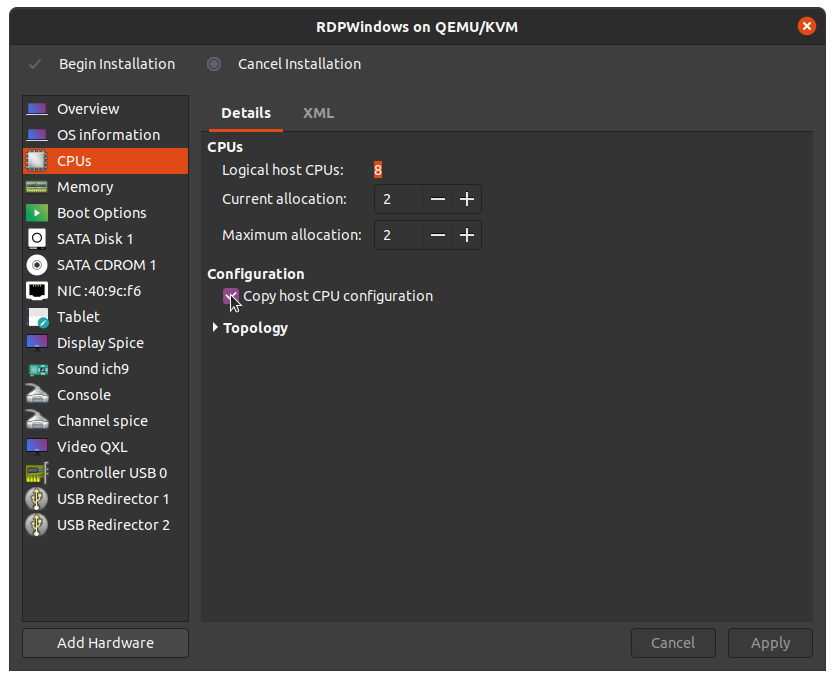
- After clicking
Finish, selectCopy host CPU configurationunder 'CPUs', and then clickApply.
Note
Sometimes this feature gets disabled after installing Windows. Make sure to check and re-enable this option after the installation is complete.
- (Optional) Configure 'CPU pinning' by following this excellent guide.
Note
CPU pinning involves assigning specific physical CPU cores to a virtual machine. This can improve performance by reducing context switching and ensuring that the VM's workload consistently uses the same cores, leading to better CPU cache utilisation.
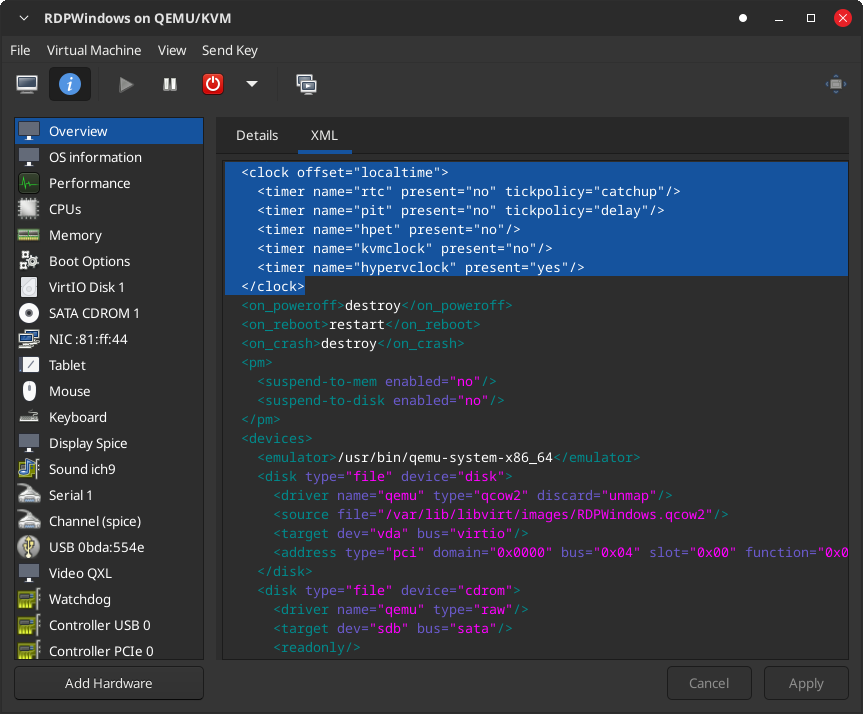
- Navigate to the
XMLtab, and edit the<clock>section to disable all timers except for the hypervclock, thereby drastically reducing idle CPU usage. Once changed, clickApply.<clock offset='localtime'> <timer name='rtc' present='no' tickpolicy='catchup'/> <timer name='pit' present='no' tickpolicy='delay'/> <timer name='hpet' present='no'/> <timer name='kvmclock' present='no'/> <timer name='hypervclock' present='yes'/> </clock>
-
Enable Hyper-V enlightenments by adding the following to the
<hyperv>section. Once changed, clickApply.<hyperv> <relaxed state='on'/> <vapic state='on'/> <spinlocks state='on' retries='8191'/> <vpindex state='on'/> <synic state='on'/> <stimer state='on'> <direct state='on'/> </stimer> <reset state='on'/> <frequencies state='on'/> <reenlightenment state='on'/> <tlbflush state='on'/> <ipi state='on'/> </hyperv>
Note
Hyper-V enlightenments make Windows (and other Hyper-V guests) think they are running on top of a Hyper-V compatible hypervisor. This enables use of Hyper-V specific features, allowing
KVMto implement paravirtualised interfaces for improved virtual machine performance.
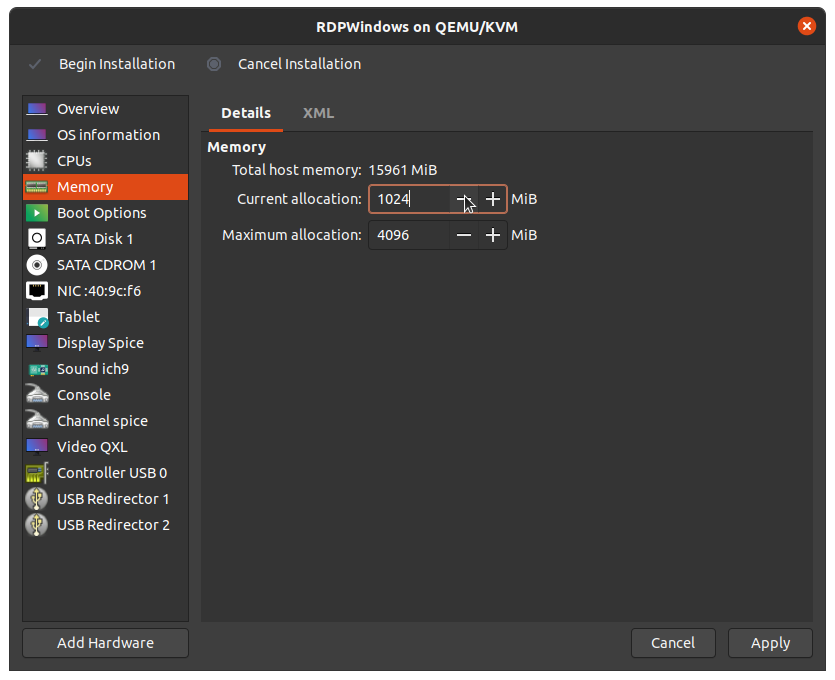
- In the 'Memory' section, set the
Current allocationto the minimum amount of memory you want the virtual machine to use, with a recommended value of1024MB.
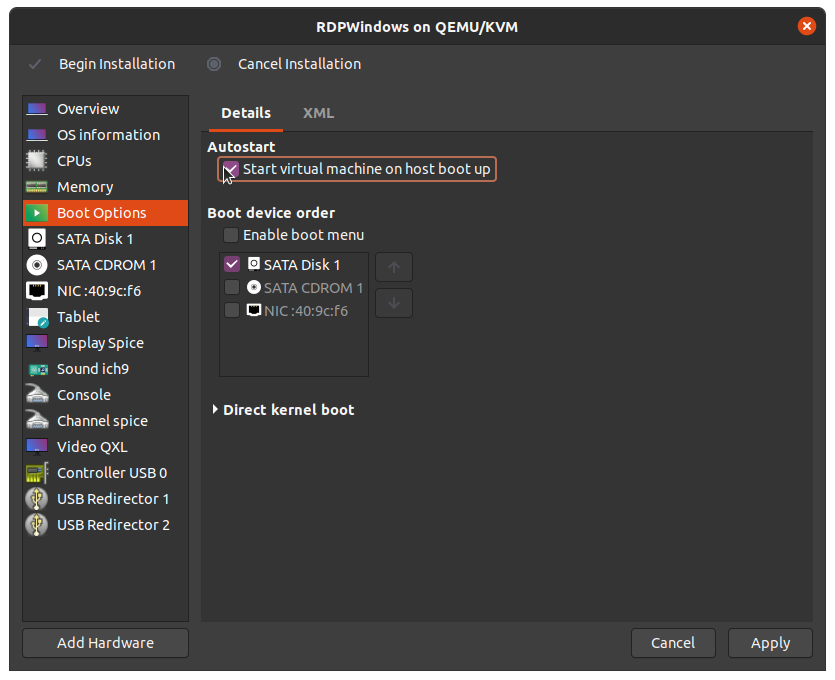
- (Optional) Under
Boot Options, enableStart virtual machine on host boot up.
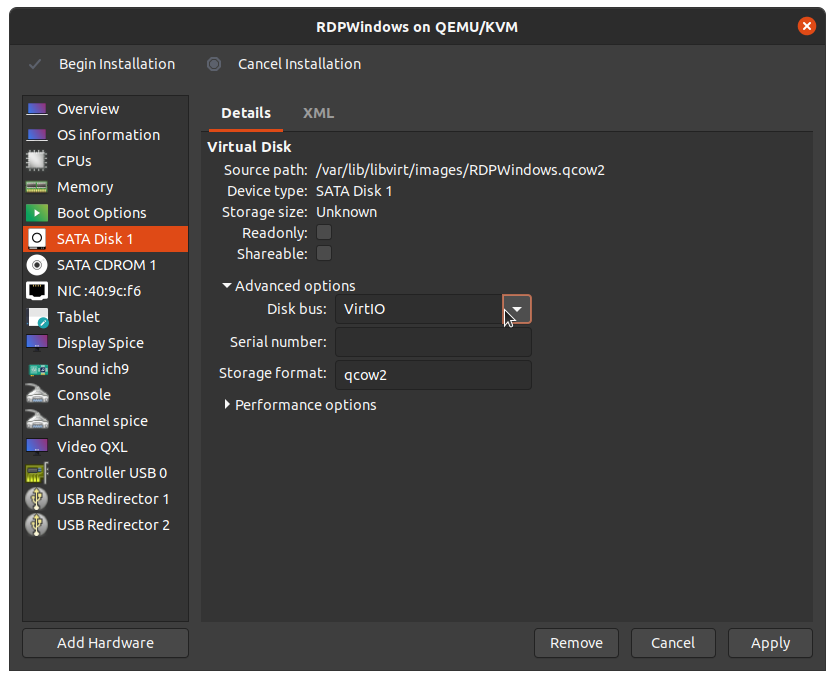
- Navigate to 'SATA Disk 1' and set the
Disk bustype toVirtIO. This allows disk access to be paravirtualised, improving virtual machine performance.
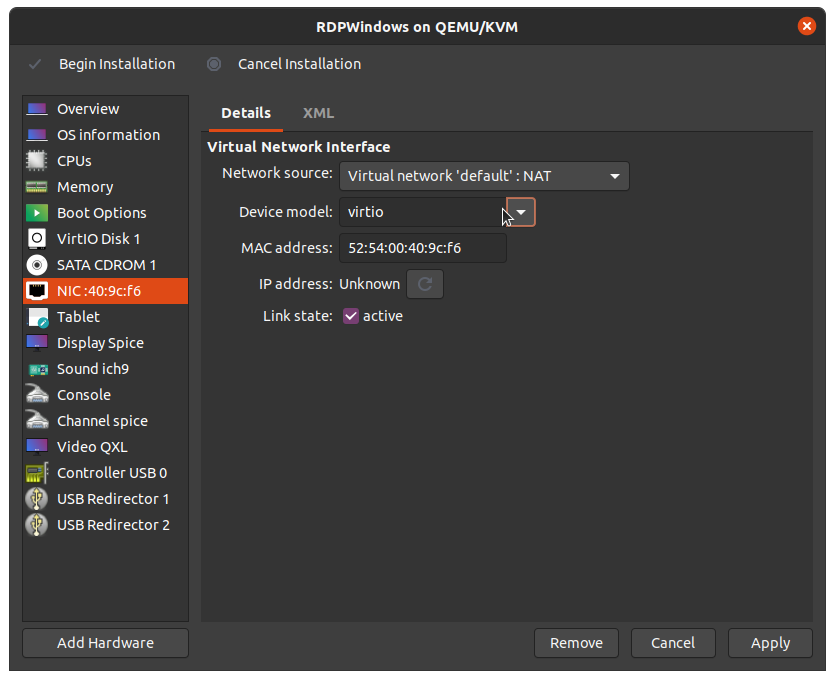
- Navigate to 'NIC' and set the
Device modeltype tovirtioto enable paravirtualised networking.
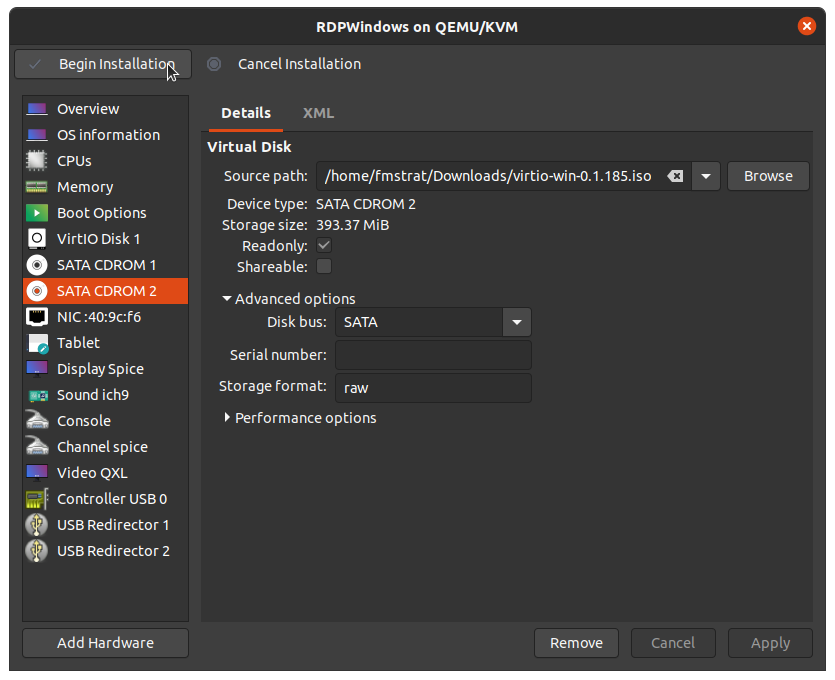
- Click the
Add Hardwarebutton in the lower left, and chooseStorage. ForDevice type, selectCDROM deviceand choose the VirtIO driver.ISOyou downloaded earlier. ClickFinishto add the new CD-ROM device.
Important
If you skip this step, the Windows installer will fail to recognise and list the virtual hard drive you created earlier.

- Click
Begin Installationin the top left.
Example .XML File
Below is an example .XML file that describes a Windows 11 virtual machine.
<domain type="kvm">
  <name>RDPWindows</name>
  <uuid>4d76e36e-c632-43e0-83c0-dc9f36c2823a</uuid>
  <metadata>
    <libosinfo:libosinfo xmlns:libosinfo="http://libosinfo.org/xmlns/libvirt/domain/1.0">
      <libosinfo:os id="http://microsoft.com/win/11"/>
    </libosinfo:libosinfo>
  </metadata>
  <memory unit="KiB">8388608</memory>
  <currentMemory unit="KiB">8388608</currentMemory>
  <vcpu placement="static">4</vcpu>
  <cputune>
    <vcpupin vcpu="0" cpuset="2"/>
    <vcpupin vcpu="1" cpuset="6"/>
    <vcpupin vcpu="2" cpuset="3"/>
    <vcpupin vcpu="3" cpuset="7"/>
  </cputune>
  <os firmware="efi">
    <type arch="x86_64" machine="pc-q35-8.1">hvm</type>
    <firmware>
      <feature enabled="yes" name="enrolled-keys"/>
      <feature enabled="yes" name="secure-boot"/>
    </firmware>
    <loader readonly="yes" secure="yes" type="pflash" format="qcow2">/usr/share/edk2/ovmf/OVMF_CODE_4M.secboot.qcow2</loader>
    <nvram template="/usr/share/edk2/ovmf/OVMF_VARS_4M.secboot.qcow2" format="qcow2">/var/lib/libvirt/qemu/nvram/RDPWindows_VARS.qcow2</nvram>
    <boot dev="hd"/>
  </os>
  <features>
    <acpi/>
    <apic/>
    <hyperv mode="custom">
      <relaxed state="on"/>
      <vapic state="on"/>
      <spinlocks state="on" retries="8191"/>
      <vpindex state="on"/>
      <synic state="on"/>
      <stimer state="on">
        <direct state="on"/>
      </stimer>
      <reset state="on"/>
      <frequencies state="on"/>
      <reenlightenment state="on"/>
      <tlbflush state="on"/>
      <ipi state="on"/>
    </hyperv>
    <vmport state="off"/>
    <smm state="on"/>
  </features>
  <cpu mode="host-passthrough" check="none" migratable="on">
    <topology sockets="1" dies="1" clusters="1" cores="2" threads="2"/>
  </cpu>
  <clock offset="localtime">
    <timer name="rtc" present="no" tickpolicy="catchup"/>
    <timer name="pit" present="no" tickpolicy="delay"/>
    <timer name="hpet" present="no"/>
    <timer name="kvmclock" present="no"/>
    <timer name="hypervclock" present="yes"/>
  </clock>
  <on_poweroff>destroy</on_poweroff>
  <on_reboot>restart</on_reboot>
  <on_crash>destroy</on_crash>
  <pm>
    <suspend-to-mem enabled="no"/>
    <suspend-to-disk enabled="no"/>
  </pm>
  <devices>
    <emulator>/usr/bin/qemu-system-x86_64</emulator>
    <disk type="file" device="disk">
      <driver name="qemu" type="qcow2" discard="unmap"/>
      <source file="/var/lib/libvirt/images/RDPWindows.qcow2"/>
      <target dev="vda" bus="virtio"/>
      <address type="pci" domain="0x0000" bus="0x04" slot="0x00" function="0x0"/>
    </disk>
    <disk type="file" device="cdrom">
      <driver name="qemu" type="raw"/>
      <target dev="sdb" bus="sata"/>
      <readonly/>
      <address type="drive" controller="0" bus="0" target="0" unit="1"/>
    </disk>
    <controller type="usb" index="0" model="qemu-xhci" ports="15">
      <address type="pci" domain="0x0000" bus="0x02" slot="0x00" function="0x0"/>
    </controller>
    <controller type="pci" index="0" model="pcie-root"/>
    <controller type="pci" index="1" model="pcie-root-port">
      <model name="pcie-root-port"/>
      <target chassis="1" port="0x10"/>
      <address type="pci" domain="0x0000" bus="0x00" slot="0x02" function="0x0" multifunction="on"/>
    </controller>
    <controller type="pci" index="2" model="pcie-root-port">
      <model name="pcie-root-port"/>
      <target chassis="2" port="0x11"/>
      <address type="pci" domain="0x0000" bus="0x00" slot="0x02" function="0x1"/>
    </controller>
    <controller type="pci" index="3" model="pcie-root-port">
      <model name="pcie-root-port"/>
      <target chassis="3" port="0x12"/>
      <address type="pci" domain="0x0000" bus="0x00" slot="0x02" function="0x2"/>
    </controller>
    <controller type="pci" index="4" model="pcie-root-port">
      <model name="pcie-root-port"/>
      <target chassis="4" port="0x13"/>
      <address type="pci" domain="0x0000" bus="0x00" slot="0x02" function="0x3"/>
    </controller>
    <controller type="pci" index="5" model="pcie-root-port">
      <model name="pcie-root-port"/>
      <target chassis="5" port="0x14"/>
      <address type="pci" domain="0x0000" bus="0x00" slot="0x02" function="0x4"/>
    </controller>
    <controller type="pci" index="6" model="pcie-root-port">
      <model name="pcie-root-port"/>
      <target chassis="6" port="0x15"/>
      <address type="pci" domain="0x0000" bus="0x00" slot="0x02" function="0x5"/>
    </controller>
    <controller type="pci" index="7" model="pcie-root-port">
      <model name="pcie-root-port"/>
      <target chassis="7" port="0x16"/>
      <address type="pci" domain="0x0000" bus="0x00" slot="0x02" function="0x6"/>
    </controller>
    <controller type="pci" index="8" model="pcie-root-port">
      <model name="pcie-root-port"/>
      <target chassis="8" port="0x17"/>
      <address type="pci" domain="0x0000" bus="0x00" slot="0x02" function="0x7"/>
    </controller>
    <controller type="pci" index="9" model="pcie-root-port">
      <model name="pcie-root-port"/>
      <target chassis="9" port="0x18"/>
      <address type="pci" domain="0x0000" bus="0x00" slot="0x03" function="0x0" multifunction="on"/>
    </controller>
    <controller type="pci" index="10" model="pcie-root-port">
      <model name="pcie-root-port"/>
      <target chassis="10" port="0x19"/>
      <address type="pci" domain="0x0000" bus="0x00" slot="0x03" function="0x1"/>
    </controller>
    <controller type="pci" index="11" model="pcie-root-port">
      <model name="pcie-root-port"/>
      <target chassis="11" port="0x1a"/>
      <address type="pci" domain="0x0000" bus="0x00" slot="0x03" function="0x2"/>
    </controller>
    <controller type="pci" index="12" model="pcie-root-port">
      <model name="pcie-root-port"/>
      <target chassis="12" port="0x1b"/>
      <address type="pci" domain="0x0000" bus="0x00" slot="0x03" function="0x3"/>
    </controller>
    <controller type="pci" index="13" model="pcie-root-port">
      <model name="pcie-root-port"/>
      <target chassis="13" port="0x1c"/>
      <address type="pci" domain="0x0000" bus="0x00" slot="0x03" function="0x4"/>
    </controller>
    <controller type="pci" index="14" model="pcie-root-port">
      <model name="pcie-root-port"/>
      <target chassis="14" port="0x1d"/>
      <address type="pci" domain="0x0000" bus="0x00" slot="0x03" function="0x5"/>
    </controller>
    <controller type="sata" index="0">
      <address type="pci" domain="0x0000" bus="0x00" slot="0x1f" function="0x2"/>
    </controller>
    <controller type="virtio-serial" index="0">
      <address type="pci" domain="0x0000" bus="0x03" slot="0x00" function="0x0"/>
    </controller>
    <interface type="network">
      <mac address="52:54:00:81:ff:44"/>
      <source network="default"/>
      <model type="virtio"/>
      <address type="pci" domain="0x0000" bus="0x01" slot="0x00" function="0x0"/>
    </interface>
    <serial type="pty">
      <target type="isa-serial" port="0">
        <model name="isa-serial"/>
      </target>
    </serial>
    <console type="pty">
      <target type="serial" port="0"/>
    </console>
    <channel type="spicevmc">
      <target type="virtio" name="com.redhat.spice.0"/>
      <address type="virtio-serial" controller="0" bus="0" port="1"/>
    </channel>
    <input type="tablet" bus="usb">
      <address type="usb" bus="0" port="1"/>
    </input>
    <input type="mouse" bus="ps2"/>
    <input type="keyboard" bus="ps2"/>
    <tpm model="tpm-crb">
      <backend type="emulator" version="2.0"/>
    </tpm>
    <graphics type="spice" autoport="yes">
      <listen type="address"/>
      <image compression="off"/>
    </graphics>
    <sound model="ich9">
      <address type="pci" domain="0x0000" bus="0x00" slot="0x1b" function="0x0"/>
    </sound>
    <audio id="1" type="spice"/>
    <video>
      <model type="qxl" ram="65536" vram="65536" vgamem="16384" heads="1" primary="yes"/>
      <address type="pci" domain="0x0000" bus="0x00" slot="0x01" function="0x0"/>
    </video>
    <hostdev mode="subsystem" type="usb" managed="yes">
      <source>
        <vendor id="0x0bda"/>
        <product id="0x554e"/>
      </source>
      <address type="usb" bus="0" port="4"/>
    </hostdev>
    <redirdev bus="usb" type="spicevmc">
      <address type="usb" bus="0" port="2"/>
    </redirdev>
    <watchdog model="itco" action="reset"/>
    <memballoon model="virtio">
      <address type="pci" domain="0x0000" bus="0x05" slot="0x00" function="0x0"/>
    </memballoon>
  </devices>
</domain>
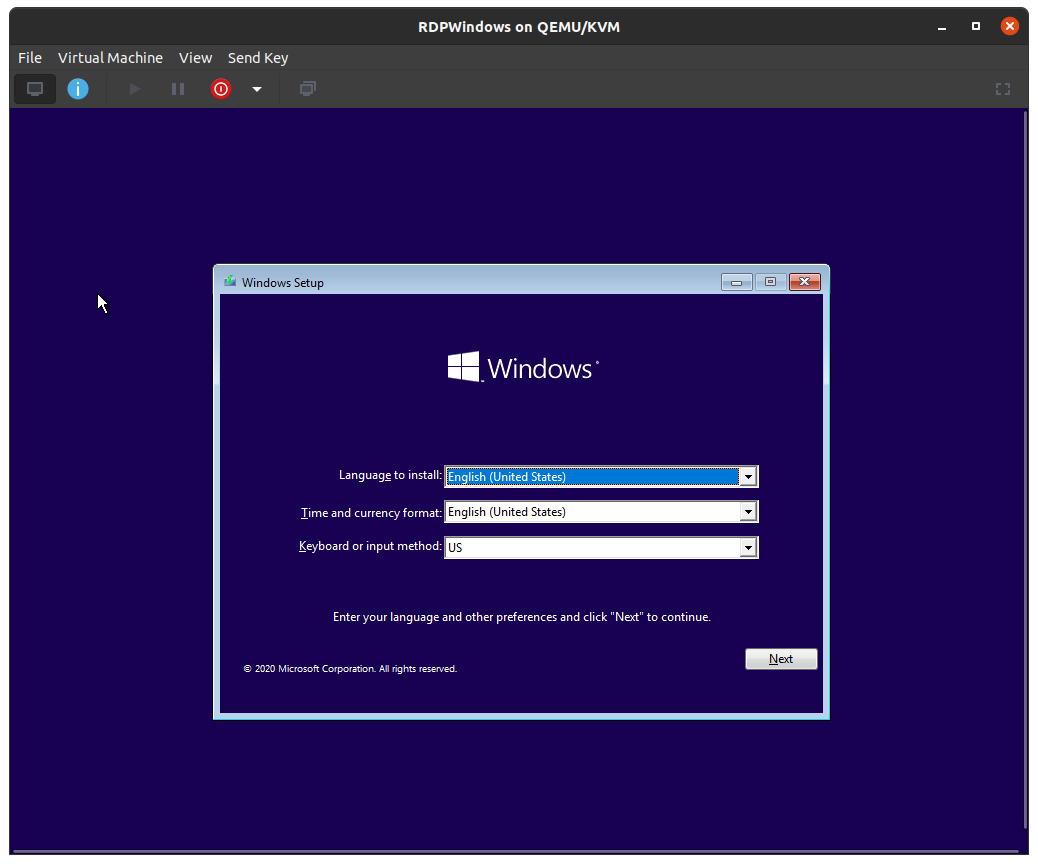
Install Windows
Install Windows as you would on any other machine.
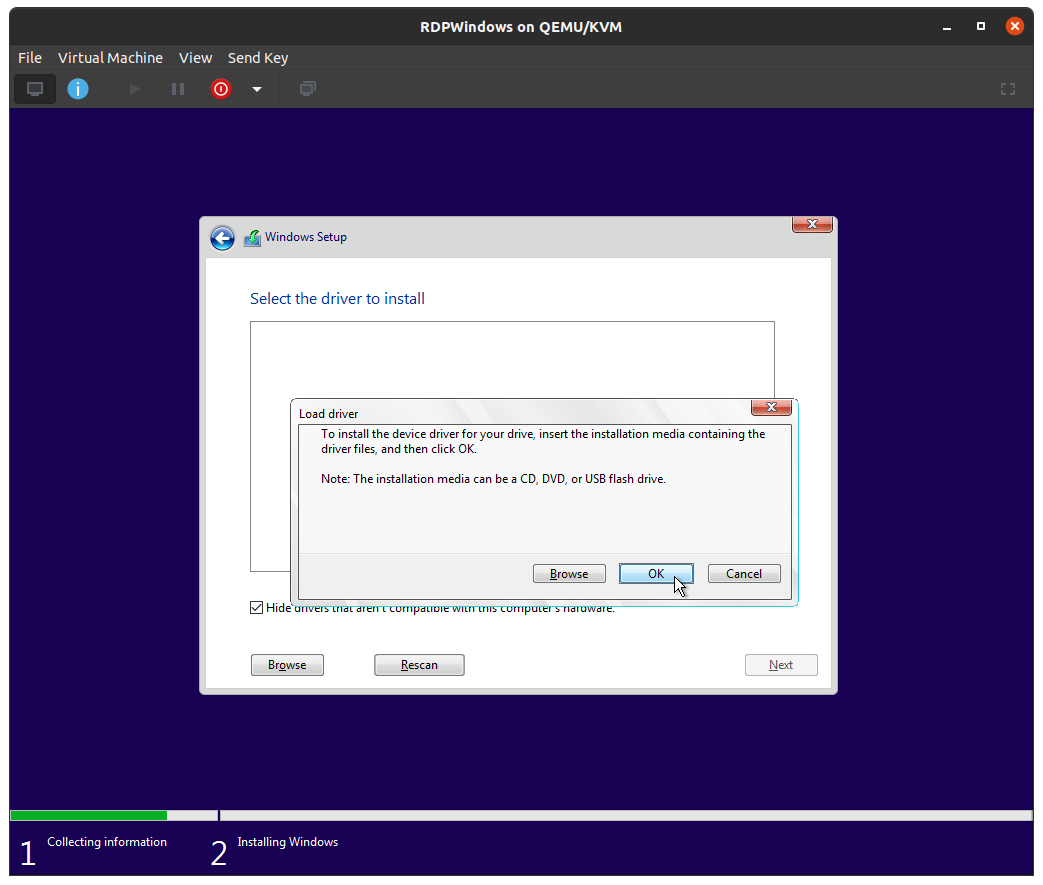
Once you get to the point of selecting the location for installation, you will see there are no disks available. This is because the VirtIO driver needs to be specified manually.
- Select
Load driver.
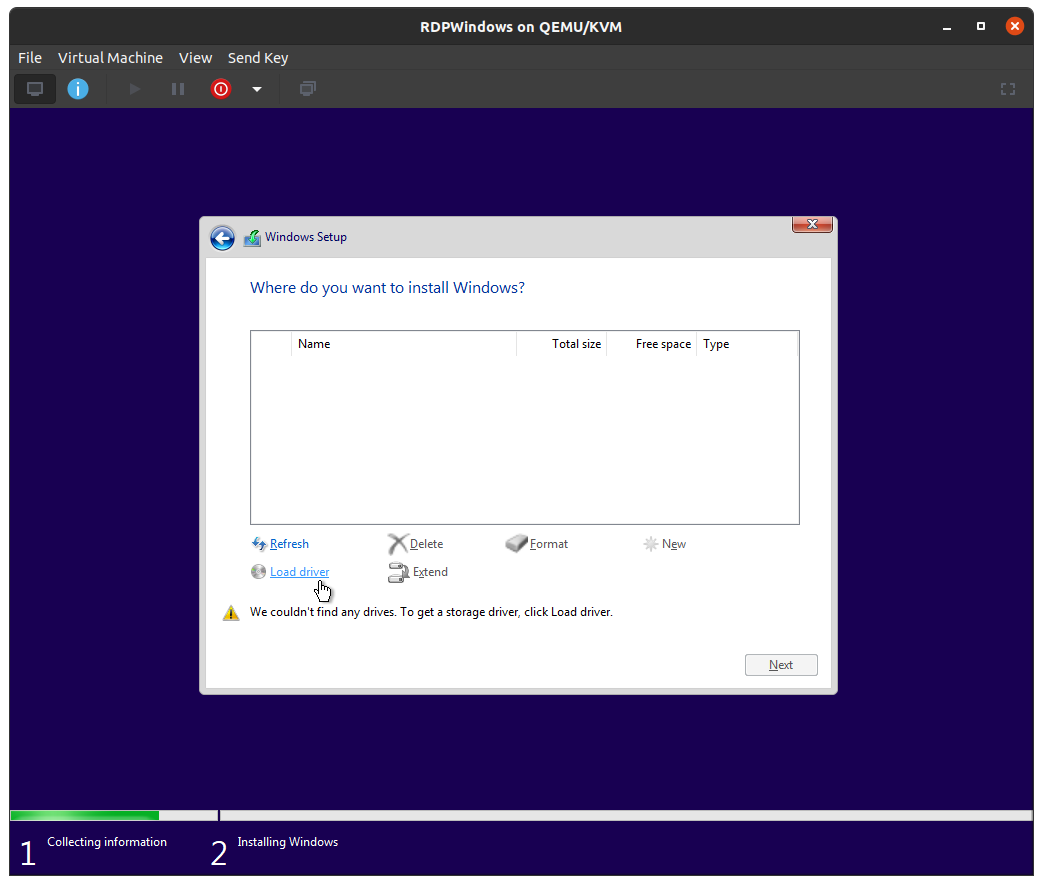
- The installer will then ask you to specify where the driver is located. Select the drive the
VirtIOdriver.ISOis mounted on.
- Choose the appropriate driver for the operating system you've selected, which is likely either the
w10orw11drivers.
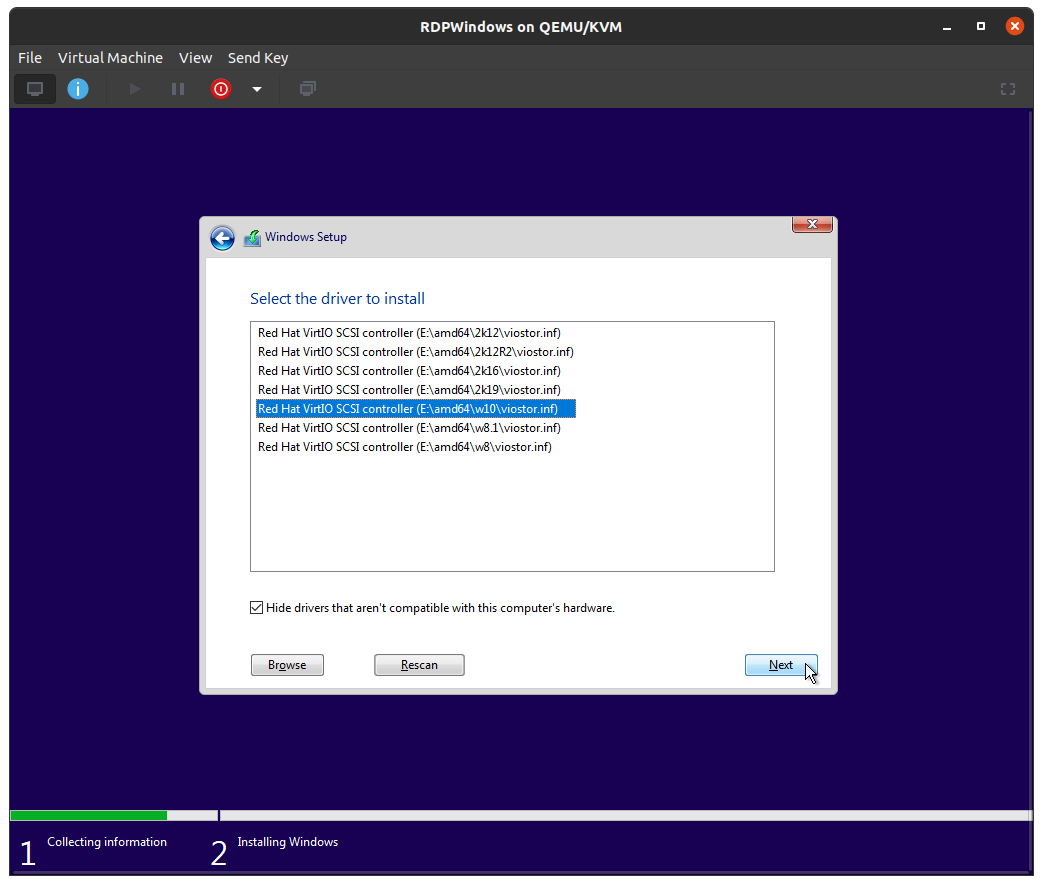
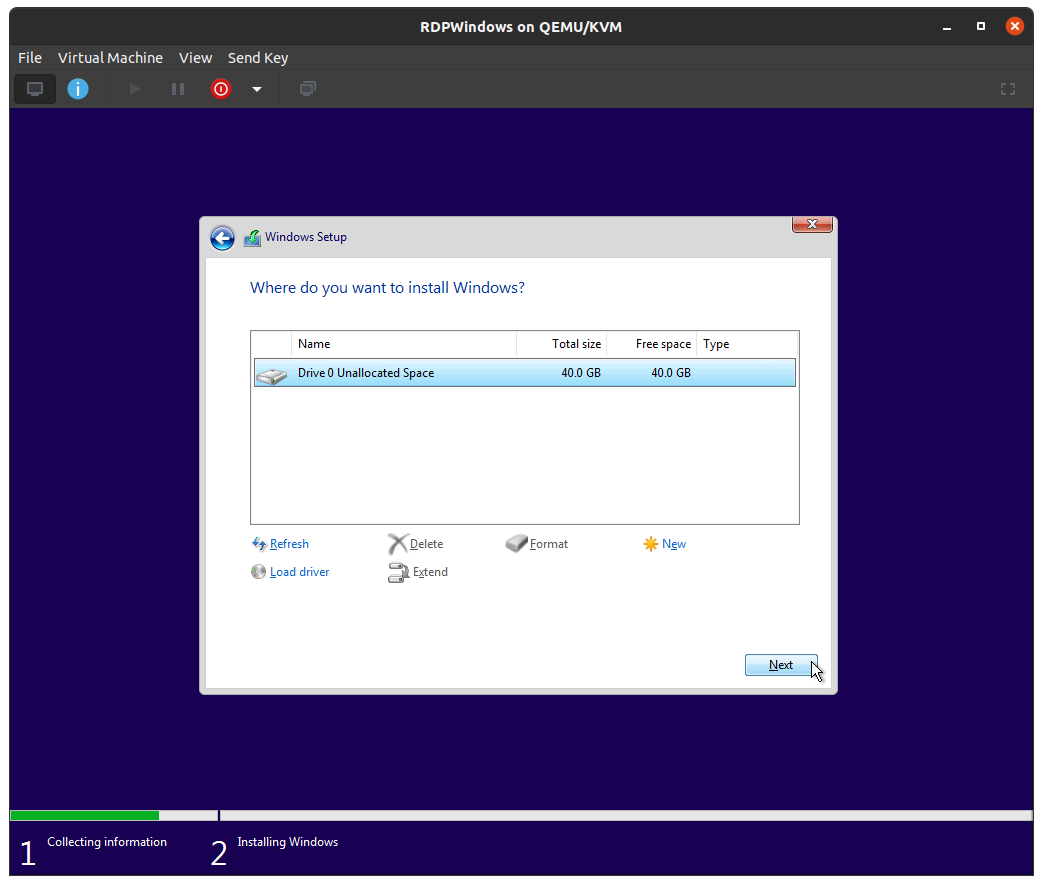
- The virtual hard disk should now be visible and available for selection.
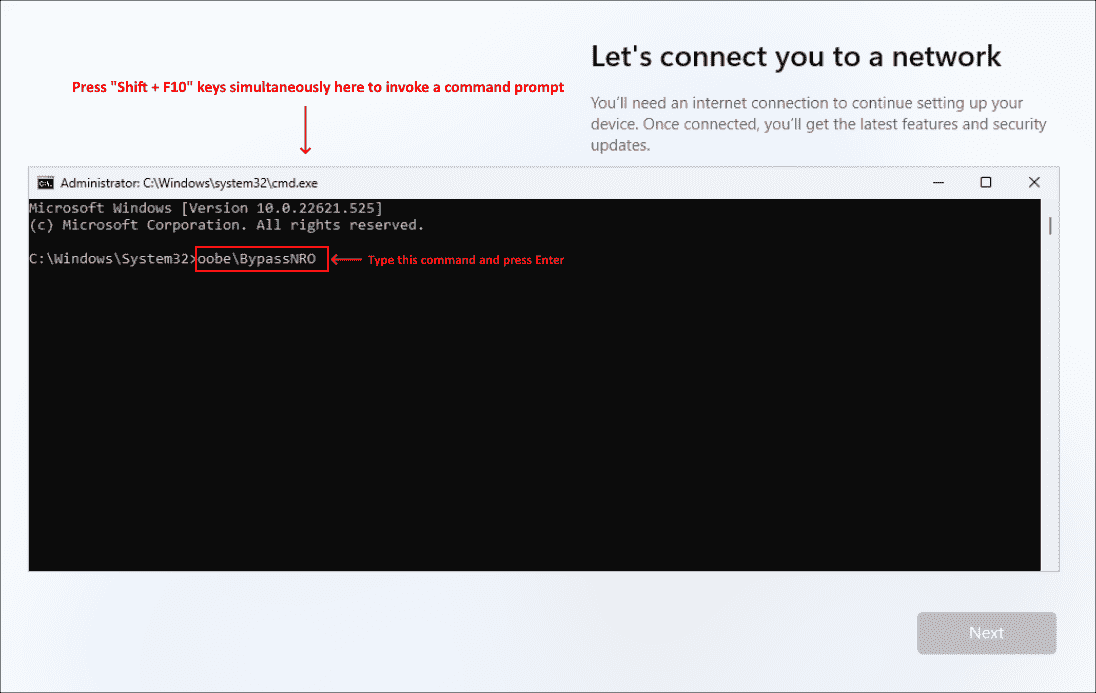
The next hurdle will be bypassing the network selection screen. As the VirtIO drivers
for networking have not yet been loaded, the virtual machine will not be able to be connected to the internet.
- For Windows 11: Press "Shift + F10" to open the command prompt. Type 'OOBE\BYPASSNRO' (without the surrounding quotation marks) and press Enter. The system will restart and now allow you to click
I don't have internet.
- For Windows 10: Simply click
I don't have internet.
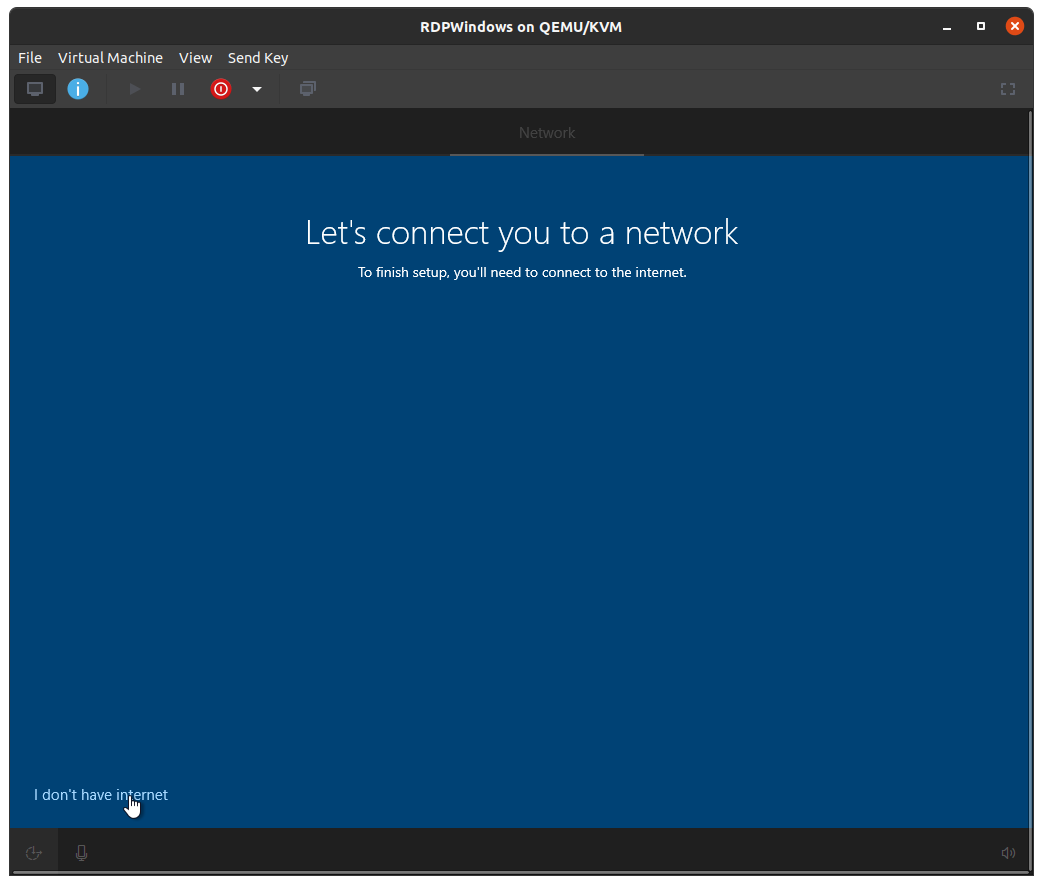
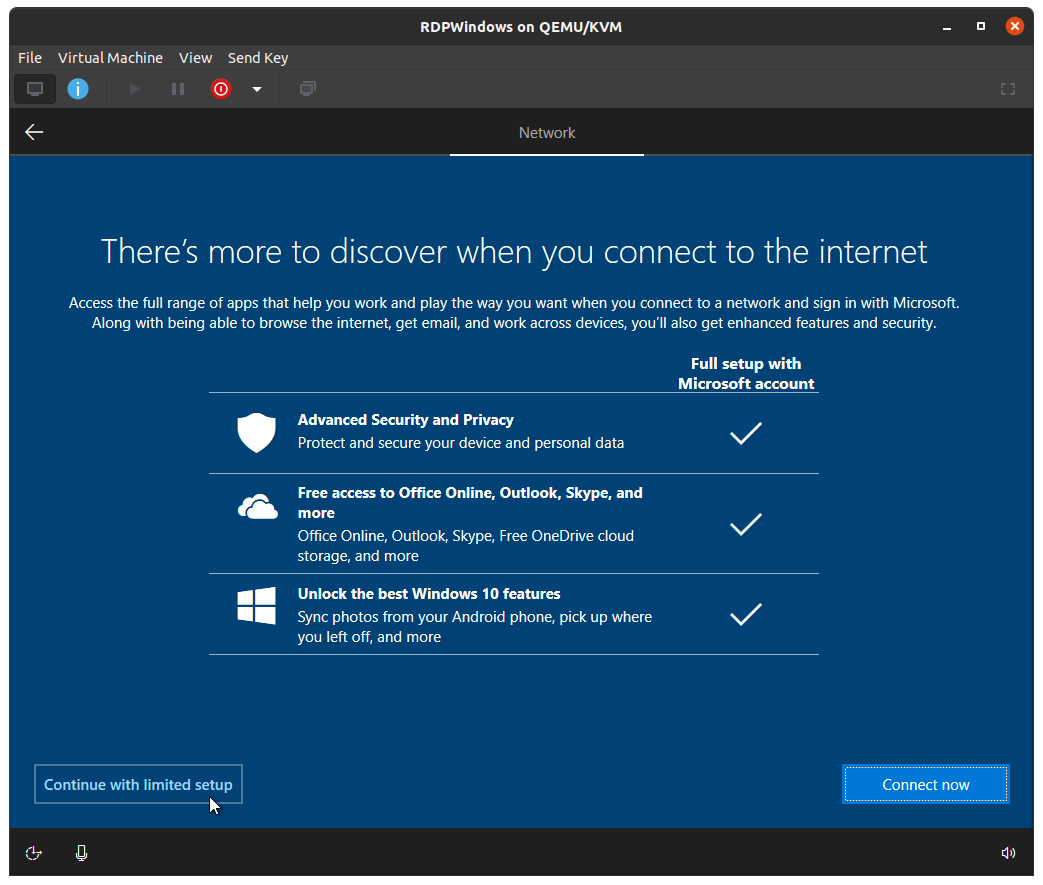
Following the above, choose to Continue with limited setup.
Final Configuration Steps
Open File Explorer and navigate to the drive where the VirtIO driver .ISO is mounted. Run virt-win-gt-64.exe to launch the VirtIO driver installer.
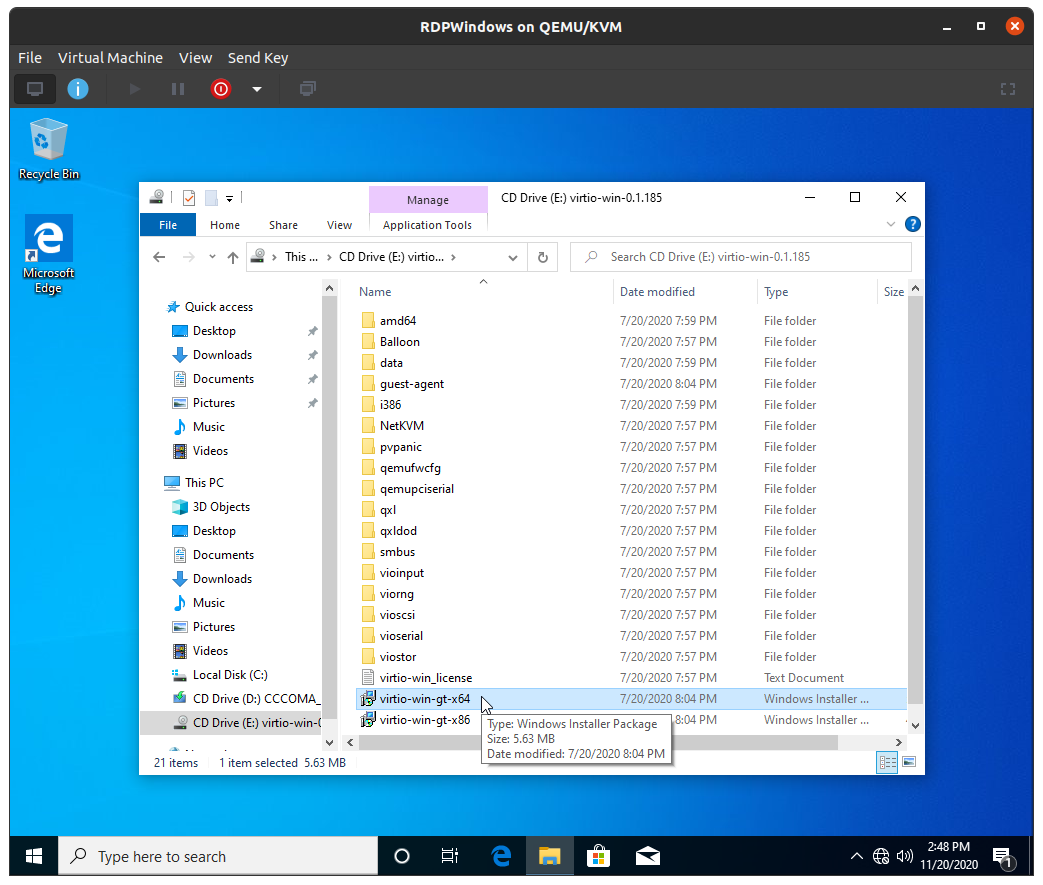
Leave everything as default and click Next through the installer. This will install all required device drivers as well as the 'Memory Ballooning' service.

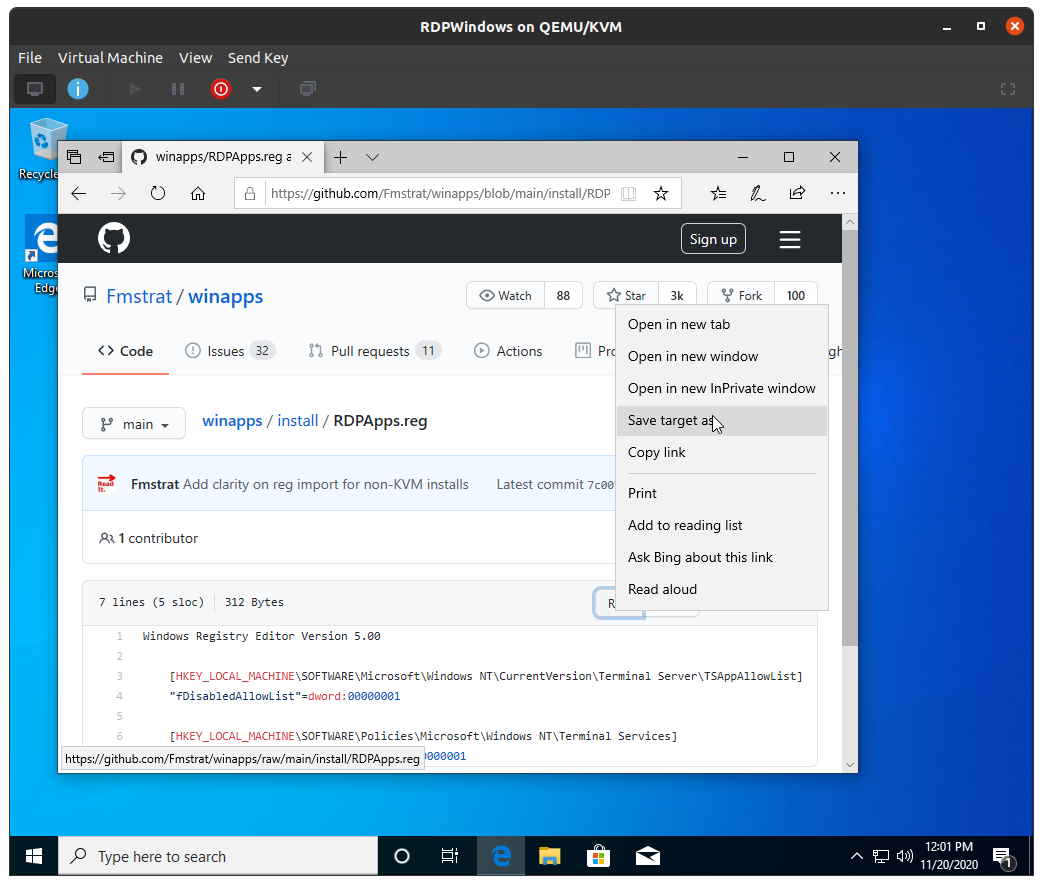
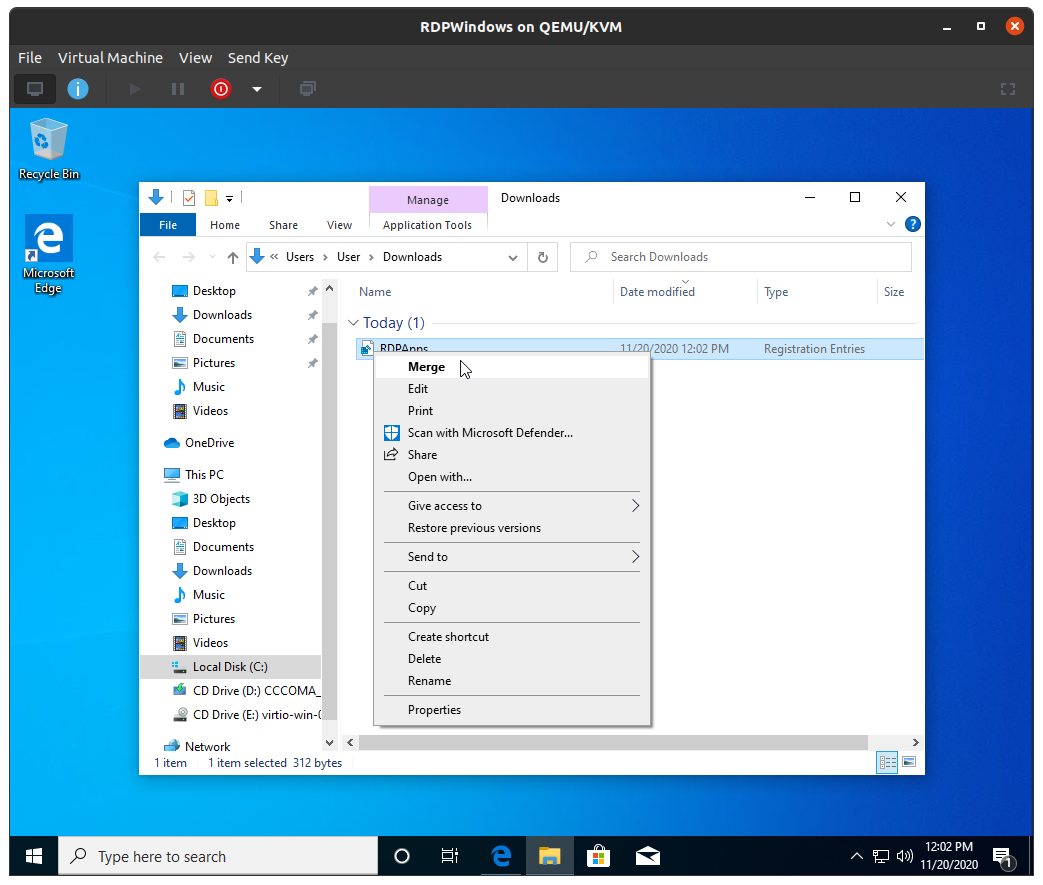
Once you finish the VirtIO driver installation, you will need to make some registry changes to enable RDP Applications to run on the system. Start by downloading the RDPApps.reg file, right-clicking on the Raw button, and clicking on Save target as.
Once you have downloaded the registry file, right-click on it, and choose Merge.
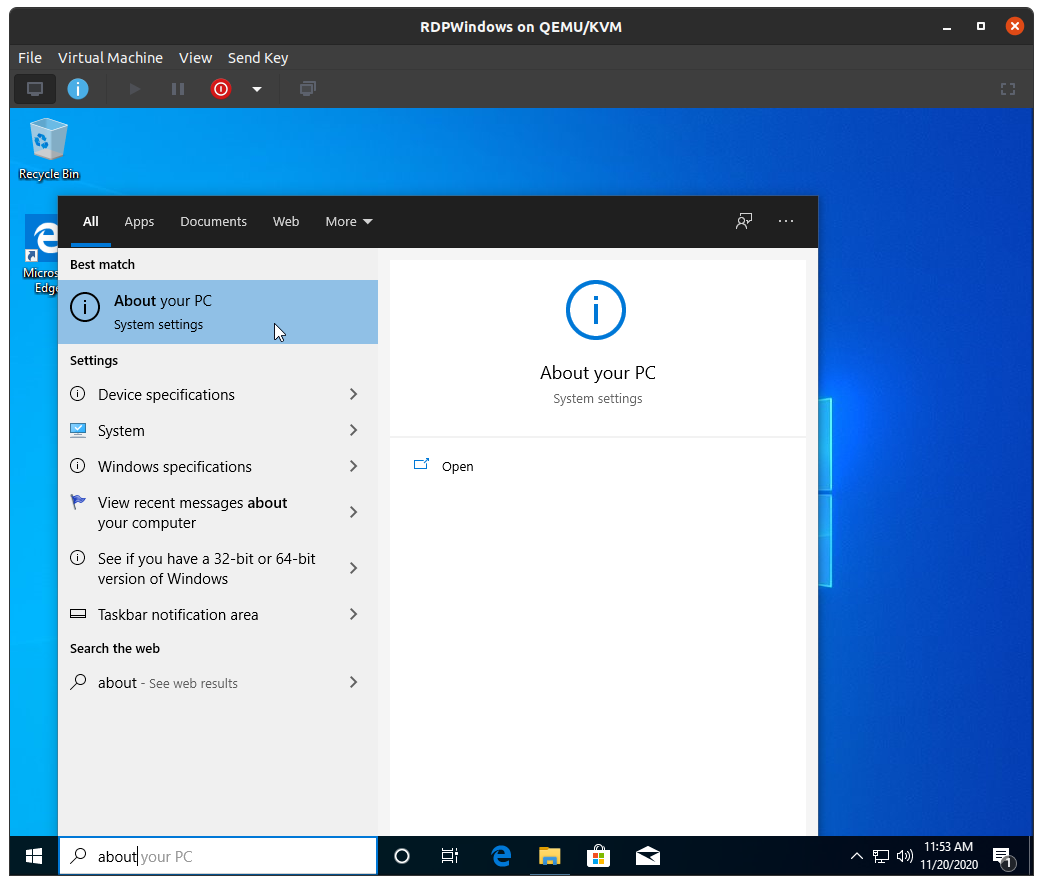
Rename the Windows virtual machine so that WinApps can locate it by navigating to the start menu and typing About to bring up the About your PC settings.
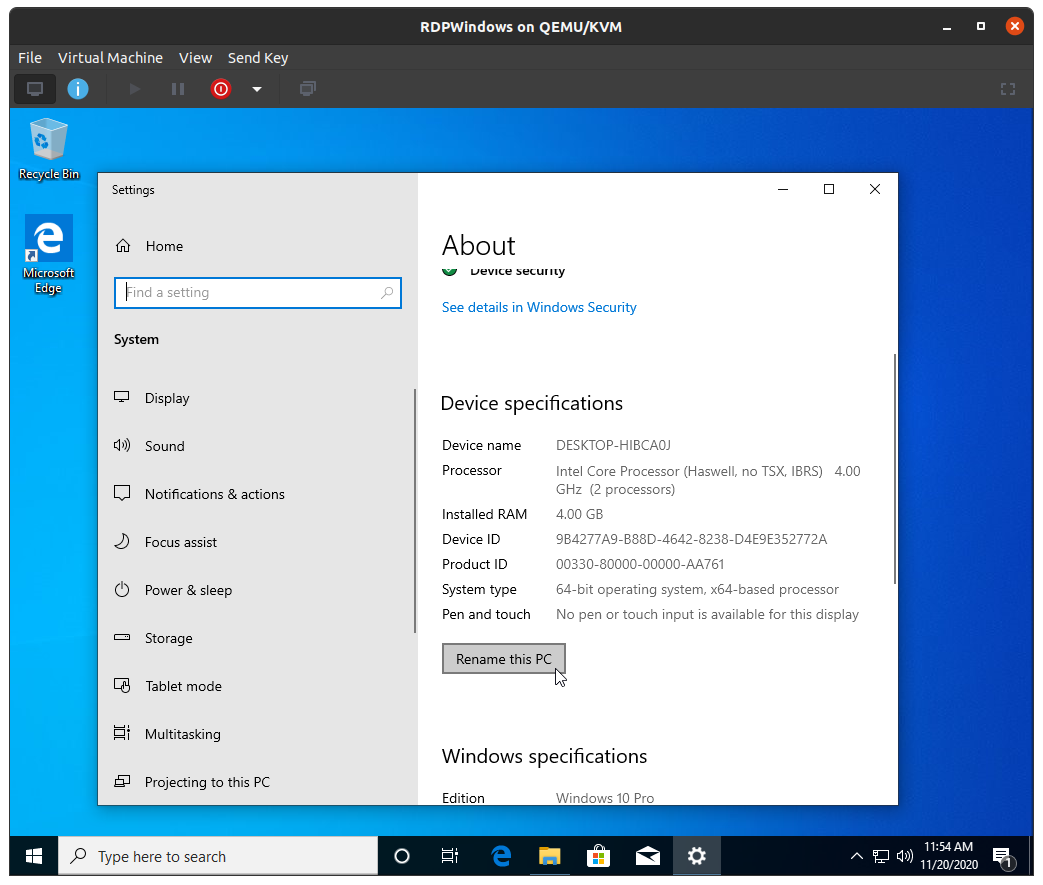
Scroll down and click on Rename this PC.
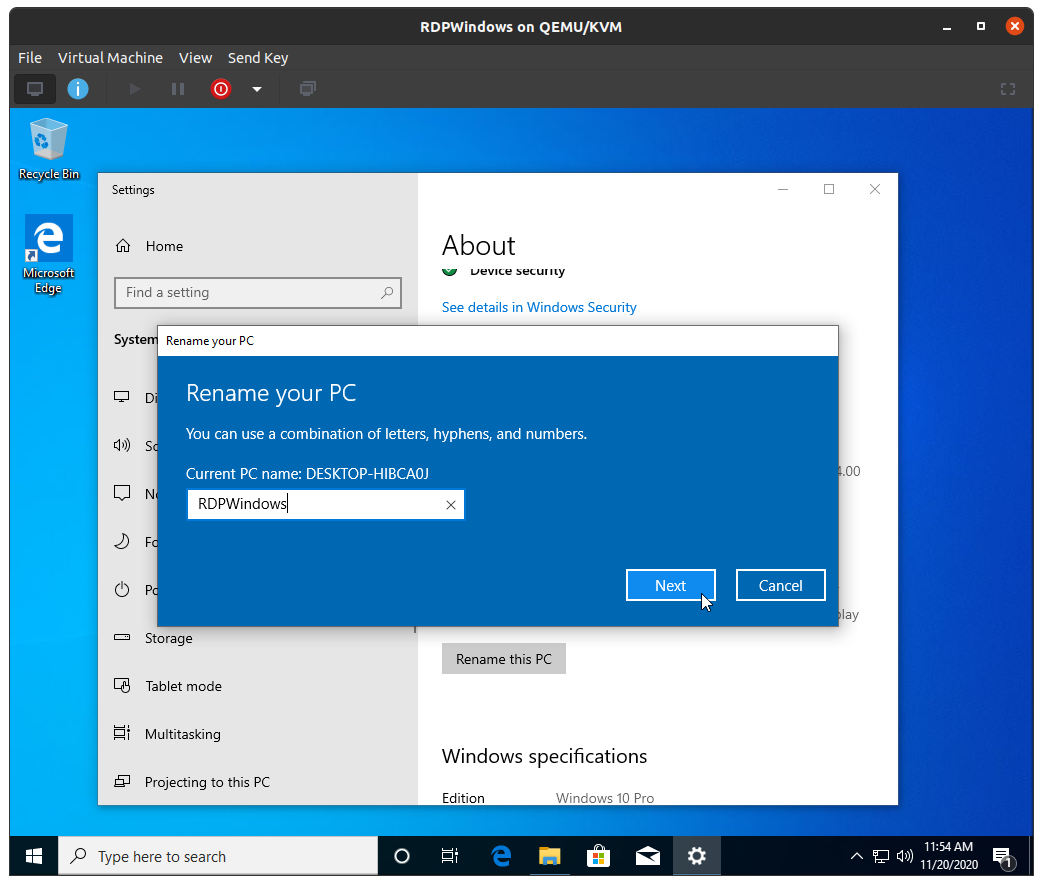
Rename the PC to RDPWindows, but DO NOT restart the virtual machine.
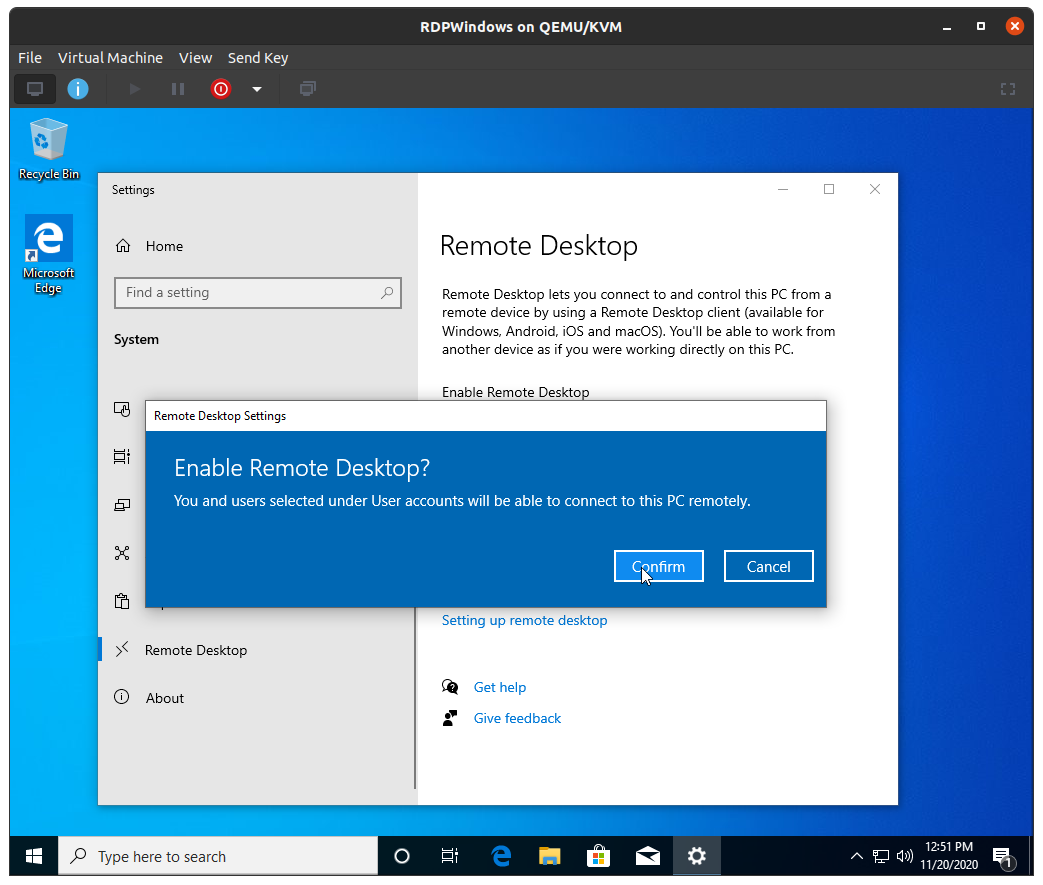
Scroll down to Remote Desktop, and enable Enable Remote Desktop.
At this point, you will need to restart the Windows virtual machine.
You may now proceed to install other applications like 'Microsoft 365', 'Adobe Creative Cloud' or any other applications you would like to use through WinApps.
Note
You may also wish to install Spice Guest Tools inside the virtual machine, which enables features like auto-desktop resize and cut-and-paste when accessing the virtual machine through
virt-manager. Since WinApps uses RDP, however, this is unnecessary if you don't plan to access the virtual machine viavirt-manager.
Important
Ensure
WAFLAVORis set to"libvirt"in your~/.config/winapps/winapps.confto prevent WinApps looking for aDockerinstallation instead.
Finally, restart the virtual machine, but DO NOT log in. Close the virtual machine viewer and proceed to run the WinApps installation.
./installer.sh
Expert Installations
Defining Windows VM from .XML
This expert guide for .XML imports is specific to Ubuntu 20.04 and may not work on all hardware platforms. Please read this guide in conjunction with the steps outlined above.
-
Copy your Windows
.ISOandVirtIOdrivers.ISOfiles into the desired folder, updating the relevant paths inkvm/RDPWindows.xml. -
Define a virtual machine called 'RDPWindows' from the sample XML file.
virsh define kvm/RDPWindows.xml virsh autostart RDPWindows # Configure the VM to start automatically when the host machine boots -
Open the virtual machine's properties in
virt-managerand ensure thatCopy host CPU configurationis enabled. -
Boot the virtual machine, install Windows and complete the final configuration steps as outlined in the main guide above.
Configuring Rootless libvirt
By default, libvirt requires sudo to run virtual machines. To enable your user to access libvirt and kvm without sudo, your user must be added to groups of the same name. Furthermore, modifications need to be made to AppArmor (if relevant to your distribution).
sudo sed -i "s/#user = "root"/user = "$(id -un)"/g" /etc/libvirt/qemu.conf # Uncomment the user = "root" line and replace root with the current username.
sudo sed -i "s/#group = "root"/group = "$(id -gn)"/g" /etc/libvirt/qemu.conf # Uncomment the group = "root" line and replace root with the current user's primary group.
sudo usermod -a -G kvm $(id -un) # Add the user to the 'kvm' group.
sudo usermod -a -G libvirt $(id -un) # Add the user to the 'libvirt' group.
sudo systemctl restart libvirtd # Restart the libvirt daemon.
sudo ln -s /etc/apparmor.d/usr.sbin.libvirtd /etc/apparmor.d/disable/ # Disable AppArmor for the libvirt daemon by creating a symbolic link.
You will need to reboot your system to ensure your user is added to the relevant groups.
Note
Systems with
SELinuxmay also require security policy adjustments to enable correct functioning of thelibvirtdaemon.